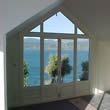
As we know, windows break all the time. Whether it's the kids throwing balls, a party gone wild, or simply a strong wind in the night, it seems that there is always at least one piece of glass around the house that needs repaired.
If it is a standard single panel of glass puttyed into a wooden frame then there is an excellent chance that you can replace it yourself.
Before You Begin :
- Working with large pieces of glass can be dangerous. Consider contacting a professional, Milne Glass. At the least you should ask someone to assist you to handle the glass.
- Don't work with large pieces of glass on a windy day.
- Ensure anyone working with the glass or chipping out the hardened putty has safety equipment on - at least safety glasses, gloves, arm and leg protection.
- This is a general guide to assist you, Milne Glass takes no responsibility for anyone following this guide.
Tools: Available from Milne Glass

Clockwise from top left - Glaziers Points - Glass cutter - Glass cutter - Safety glasses - Glass sucker - Safety gloves - Glazing wedge roller - Duster brush - Flat knife - Flat knife - Hack out knife.
Step One: Remove the old glass and putty
- If there are no large holes of missing glass in the broken panel then use duct tape to cover all the cracks to hold the glass together. If there are holes in the glass, then do not tape it, rather loosen each piece of glass as you remove the putty and glazing points. Ensure you have gloves and safety glasses on.
- Starting with the top and then working down the sides, remove the old face putty with a hammer and hack out knife or chisel. Take care to remove only the putty and not to dig into the frame, also ensure you work with the grain of the timber and not into the grain as working into the grain may cause splitting.
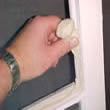
- Remove the old glazing points or nails with pliers(these were there to hold the glass in place while the putty hardened), or work them out with a chisel or hack out knife.
- Either from behind the window tap out the glass with a hammer, or use a glass sucker to pull out the glass. The tape on the glass should hold the broken pieces together. Ensure you dispose of the broken glass properly & safely or leave it for us to dispose of when you pick up the new glass.
- Once all the face putty and glass have been removed then clean off the old backing putty which was behind the glass.
- Either use a surform rasp or sand paper to smooth out the rebate, the smoother the rebate is then the easier your job will be when it comes to making a nice facing job with the new putty.
- When the rebate has been cleaned and all the loose fragments have been brushed away using a duster brush, then seal the rebate with a primer paint.
Step Two: Measure for new glass
- Take your time and ensure you measure correctly. Measure in a number of different places and then take about 2mm - 3mm off the tightest size to allow for clearance.
- When ordering the glass it is helpful to have the details of the situation e.g. lounge window, bathroom window, next to a door, Distance from the floor level. This helps to ensure you get the right thickness of glass or safety glass if required by NZ Safety Standards 4223.
- When you have the size and situation then contact Milne Glass and place an order for the glass, putty, glazing points, and tools required. You can either pick up or for larger sizes we can arrange delivery within the wellington region.
Step Three: Install the new glass
- If you are not experienced running the putty into the rebate using your thumb, then the next best way is to take some putty and roll it into thin ropes between your hands and then press it into the back of the rebate ensuring that the back of the rebate is covered with putty.
- With gloves on take the new glass, sit the bottom of the glass into the rebate and gently settle the whole panel back and into the rebate putty. Keeping your gloves on, take your time and gently move around the edge of the glass pressing the glass into the backing putty which should be getting squeezed out the back, never push in the centre of the glass. Keep moving around the edge pushing the glass back until it is firmly in.
- Secure the new glass by pushing in the glazing push points which have ears to make them easy to install. The glazing points secure the glass in place while the putty hardens.
- From the inside, using a flat glazing knife, trim off the excess back putty which has been squeezed out when the glass was pushed in.
Step Four: Seal off with face putty
- If you are not experienced running the putty into the rebate using your thumb, then the next best way is to take some putty and roll it into thin ropes between your hands and then press it into the front of the rebate.
- Using a putty knife smooth the face putty on an angle ideally about 1mm to 2mm lower than the line of the back putty, this leaves a "painters line" so that when the putty is painted the paint can fully cover the putty and can go slightly onto the glass to ensure a good weather seal.
- When the face putty and the back putty have been trimmed back to where they should be, then lightly brush off with the duster brush, this smooth's off any feather edges and ensures that the putty is fully sealed against the glass.
Step Five: Finish off
- Wait at least two weeks, maybe three, for the putty to skin off before using a good quality primer and then finish painting with top coats. Only use a quality primer as cheaper paints are known to peel off of the putty after a time.
- Painting the putty and onto the glass up to the "painters line" ensures a good weather seal and also protects the putty from drying out too much and becoming loose.
|


 Tape glass to hold glass all together
  Hack out old putty
  Remove the old glazing points
  Remove the glass with glass sucker
  Glass should stay together
 Remove the back putty
  Rasp & dust
 Prime rebate
 Install the glass, bottom first - push back around edges
  Install push points
 Cut off excess back putty
 Face off
 Dust & clean